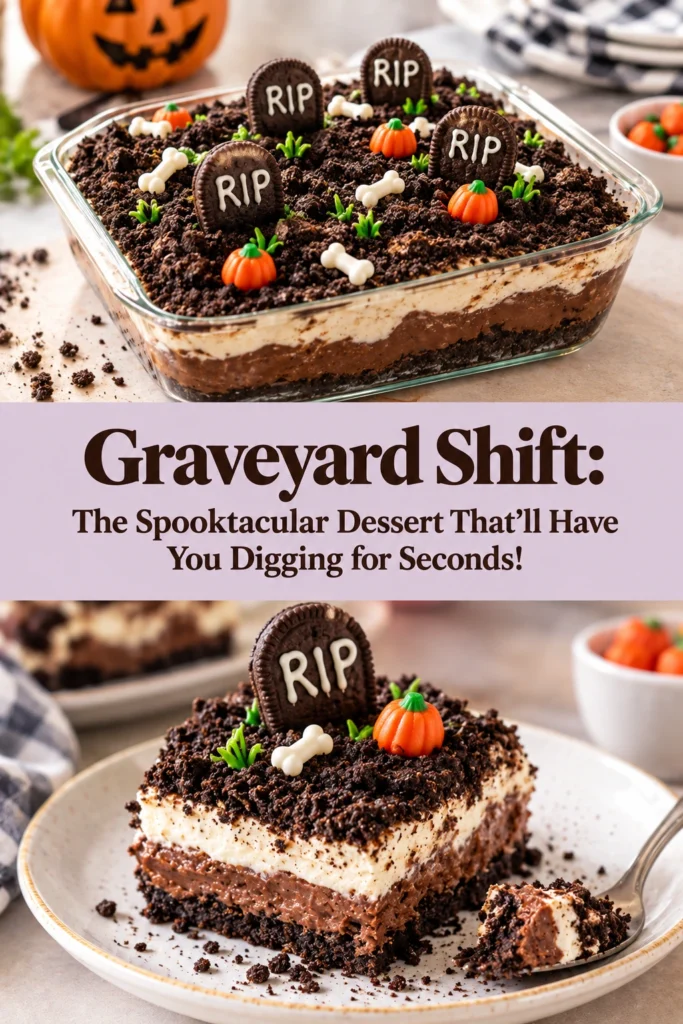
The magic happens the moment the crushed chocolate wafers hit the creamy pudding, transforming a simple bowl into a realistic patch of garden soil.
This dessert is a classic Dirt Cake, layered with chocolate flavors and topped with gummy worms and tombstone cookies to create a graveyard scene.
Readers enjoy this treat because it balances a rich, velvety texture with the crunch of cocoa cookies, making it satisfying without being overly sweet.
Unlike store-bought puddings, this version uses a layered approach that prevents the dessert from feeling too heavy or one-dimensional.
It is an ideal choice for parents hosting a party or anyone needing a high-impact dessert that requires zero actual baking.
The process is straightforward, relying on assembly rather than oven timers and precise temperatures.
- ●Why You’ll Love This Recipe
- ●A Brief Background / Why This Recipe Works
- ●Perfect For Spooky Parties and Family Gatherings
- ●Main Ingredient Spotlight: Chocolate Pudding
- ●Secondary Ingredient Spotlight: Oreo Cookies
- ●Key Ingredients
- ●How to Make It
- ●Pro Tips
- ●Delicious Variations
- ●Best Ways to Serve
- ●Storage and Leftovers
- ●Frequently Asked Questions
- ●Why This Recipe Belongs in Your Weekly Rotation
- ●Final Thoughts
This dessert succeeds contrast, pairing different forms of chocolate and texture to keep the palate interested.
- ●The no-bake assembly means you spend more time decorating and less time cleaning pots and pans.
- ●Using a clear glass bowl allows guests to see the distinct layers of cream and “dirt.”
- ●The combination of pudding and whipped topping creates a mousse-like consistency that is lighter than traditional fudge.
- ●Customizable toppings let you adjust the spookiness level based on whether kids or adults are attending.
- ●It scales easily for large crowds, allowing you to fill a massive trifle bowl or individual cups.
- ●Preparation can be done a day in advance, removing the stress of party-day hosting.
- ●The crushed cookies act as a moisture barrier, keeping the top layer from getting soggy.
- ●It offers a nostalgic flavor profile that reminds adults of childhood while exciting children.
These specific elements make it more than just a sweet treat; it becomes a centerpiece for your table.
A Brief Background / Why This Recipe Works |
Dirt cake relies on the principle of layering fats and sugars to create a stable, creamy structure. topping into the pudding, the dessert gains aeration, which prevents the chocolate from tasting too dense.
The saltiness of the cocoa cookies cuts through the richness of the dairy, providing a necessary balance that encourages more than one serving.
This recipe works because it uses accessible ingredients to create a visual illusion, making the presentation the primary attraction.
Perfect For Spooky Parties and Family Gatherings |
Because there is no oven involved, this is a safe project for children to help with during the holidays. They can handle the crushing of the cookies and the placement of the gummy worms.
For busy weeknights leading up to Halloween, the ability to prep this in twenty minutes makes it a low-stress option. It pairs well with other easy treats like Spooktacular Halloween Rice Crispy Treats Recipe Fun Dessert Easy Halloween Treats
During larger gatherings, this dessert functions as a shared platter, reducing the need for individual plating and serving utensils.
Main Ingredient Spotlight: Chocolate Pudding |
Chocolate pudding provides the structural base and the core flavor of the dessert. Its thick viscosity is what holds the gummy worms in place and prevents the cookie crumbs from sinking to the bottom.
When mixed with whipped cream, the pudding transforms from a gel-like consistency to a fluffy cream. This shift is vital for ensuring the dessert feels like a treat rather than a snack cup.
Secondary Ingredient Spotlight: Oreo Cookies |
The cocoa-based cookies provide the visual and textural representation of soil. The dark color is essential for the graveyard aesthetic, and the fine crumbs create a realistic appearance.
When crushed, these cookies release a slight bitterness from the cocoa, which balances the sugar in the pudding. If you omit these, the dessert loses its thematic identity and its contrasting crunch.
Key Ingredients |
These components work together to build the flavors and the spooky visual theme.
- ●Chocolate Pudding — creates the rich, creamy center and provides the primary sweetness.
- ●Whipped Topping — lightens the texture of the pudding and adds a dairier flavor.
- ●Oreo Cookies — pulverized to look like dirt and provide a crunchy contrast.
- ●Cream Cheese — adds a tangy richness and helps the pudding set firmly.
- ●Gummy Worms — adds a chewy texture and a playful, spooky visual element.
- ●Milano Cookies — shaped like rectangles to serve as the graveyard tombstones.
How to Make It |
Follow these steps to assemble your graveyard dessert with a focus on clean layers and a spooky finish.
- Prepare the pudding: Whisk the chocolate pudding mix with cold milk until completely smooth. Avoid over-beating, as too many air bubbles can leave gaps in your layers.
- Cream the cheese: Beat the softened cream cheese until it is smooth and free of lumps. This prevents small white chunks from appearing in the chocolate mixture, which would ruin the uniform color.
- Combine the bases: Fold the whipped topping and the creamed cheese into the prepared pudding. Use a spatula to gently incorporate the ingredients so you do not deflate the whipped topping.
- Crush the cookies: Place Oreo cookies in a sealed bag and crush them into fine crumbs using a rolling pin. Ensure there are no large chunks, as a fine powder looks more like actual soil.
- Build the layers: Spoon a layer of cookie crumbs into the bottom of a clear bowl, followed by a layer of the chocolate cream. Repeat this process until the bowl is nearly full, ending with a thick layer of crumbs on top.
- Decorate the scene: Push the Milano cookies vertically into the top layer to look like tombstones. Tuck gummy worms halfway into the “dirt” so they appear to be crawling out of the ground.
1Use these techniques to improve the presentation and stability of your dirt cake.
- ●2Chill the bowl: Put your serving bowl in the fridge for 10 minutes before assembling to help the pudding set faster.
- ●3Sift the crumbs: Use a coarse strainer to remove any oversized cookie pieces for a more realistic soil look.
- ●4Room temperature cheese: Ensure the cream cheese is fully softened; otherwise, it will create streaks in the pudding.
- ●5Layering tool: Use an offset spatula to smooth the pudding layers, ensuring they are level before adding more crumbs.
- ●6Prevent sticking: Line your cookie-crushing bag with a paper towel to absorb excess oils and prevent the bag from tearing.
Delicious Variations |
You can adapt this recipe to fit different flavor preferences or dietary needs.
- ●White Chocolate Graveyard: Swap the chocolate pudding for vanilla and use white chocolate cookies for a ghostly look.
- ●Nutty Soil: Mix finely chopped walnuts or pecans into the Oreo crumbs for added depth and crunch.
- ●Fruit Undergrowth: Add a layer of fresh raspberries or sliced strawberries between the pudding and crumbs.
- ●Minty Fresh: Use mint-flavored chocolate cookies to give the dessert a refreshing twist.
- ●Dairy-Free Option: Use coconut whipped cream and a dairy-free pudding alternative for a vegan version.
These changes allow you to transform the dessert for different holidays or dietary restrictions.
Best Ways to Serve |
Presentation is everything with a themed dessert. While a large bowl is classic, there are other ways to showcase this treat.
- ●Individual Mason Jars: Layer the ingredients in small jars for a portable, party-friendly portion.
- ●Plastic Cups: Use clear disposable cups for children’s parties to make cleanup easier.
- ●Trough Style: Use a long rectangular dish to create a larger, linear cemetery scene.
To complete the table, place the dessert alongside other themed treats like Create Spooktacular Halloween Swirl Brownies Today Easy Halloween Dessert Idea or Zesty Vampire Coffin Cupcakes Spooky Sinfully Tasty Halloween Dessert Ideas
Serve the cake chilled, as the cold temperature enhances the contrast between the creamy pudding and the crisp cookies.
Storage and Leftovers |
Refrigerating
Store the dessert in an airtight container in the refrigerator for up to 4 days. The cookie layers will soften slightly over time, but the flavor remains consistent.
Reheating
This is a no-bake, chilled dessert and should not be reheated. Heating the pudding and whipped topping will cause the structure to collapse and separate.
Freezing
You can freeze the pudding base for up to 2 weeks, but do not freeze the cookies or gummy worms. Add the fresh crumbs and decorations after thawing the base in the fridge.
Frequently Asked Questions |
- ●Q: Can I use a different type of cookie for the dirt?A: Yes, you can use any dark chocolate wafer or cocoa-based cookie. However, avoid cookies with heavy fillings or nuts if you want a perfectly smooth, soil-like appearance on the surface of the dessert.
- ●Q: How do I stop the tombstones from falling over?A: Push the cookies deep into the pudding layer before adding the final layer of crumbs. The pudding acts as an anchor, while the crumbs provide side-support to keep the cookies upright.
- ●Q: Is it possible to make this less sweet?A: You can reduce the sweetness by adding a pinch of salt to the pudding mixture or by using a dark chocolate pudding with a higher cocoa percentage to introduce a more bitter profile.
- ●Q: What is the best way to crush the cookies without a food processor?A: Place the cookies in a heavy-duty freezer bag and use a rolling pin or a heavy skillet to press down firmly. This gives you more control over the texture than a processor does.
- ●Q: Can I make this without cream cheese?A: Yes, you can omit the cream cheese, but the dessert will be softer and less stable. The cream cheese provides a necessary thickness that helps the dessert hold its shape when scooped.
Why This Recipe Belongs in Your Weekly Rotation |
This treat is a reliable winner because it appeals to the visual imagination of children while delivering a flavor profile that adults genuinely enjoy. It removes the anxiety of baking failures simple assembly.
The versatility of the base means you can pivot from a spooky graveyard in October to a garden-themed dessert in the spring with just a few changes to the toppings.
Adding it to your rotation ensures you always have a go-to crowd-pleaser that looks professional but requires minimal effort.
Final Thoughts |
The Graveyard Shift dessert is a playful blend of rich chocolate pudding, light cream, and crunchy cocoa crumbs, finished with a spooky thematic twist.
It is the perfect solution for those who want a high-impact party dessert without the stress of measuring flour or monitoring an oven.
Gather your ingredients and start digging into this delicious, eerie treat today!
Graveyard Shift: The Spooktacular Dessert That’ll Have You Digging for Seconds!
- Total Time: 20 minutes
- Yield: 8 servings 1x
Description
A spooky, no-bake dessert featuring layers of chocolate pudding, whipped topping, and crushed Oreos, topped with gummy worms and cookie tombstones.
Ingredients
- 1 package (3.4 oz) instant chocolate pudding mix
- 3 cups cold milk
- 1 package (8 oz) cream cheese, softened
- 1 container (8 oz) whipped topping, thawed
- 24 Oreo cookies, crushed
- 1 package gummy worms
- 6–8 Milano cookies (for tombstones)
Instructions
- In a medium bowl, whisk together the instant chocolate pudding mix and cold milk until smooth.
- In a separate bowl, beat the softened cream cheese until smooth and creamy.
- Gently fold the whipped topping and the beaten cream cheese into the chocolate pudding until fully combined.
- Place Oreo cookies in a plastic bag and crush them into fine crumbs using a rolling pin.
- In a clear glass bowl or trifle dish, create a layer of cookie crumbs on the bottom.
- Spoon a layer of the chocolate cream mixture over the crumbs.
- Repeat the layers of crumbs and cream until the bowl is filled, finishing with a layer of cookie crumbs on top.
- Insert Milano cookies vertically into the top layer to look like tombstones.
- Place gummy worms throughout the top and sides of the dessert for a spooky effect.
- Refrigerate for at least 1 hour before serving.
- Prep Time: 20 minutes
- Cook Time: 0 minutes
- Category: Dessert
- Method: No-Bake
- Cuisine: American