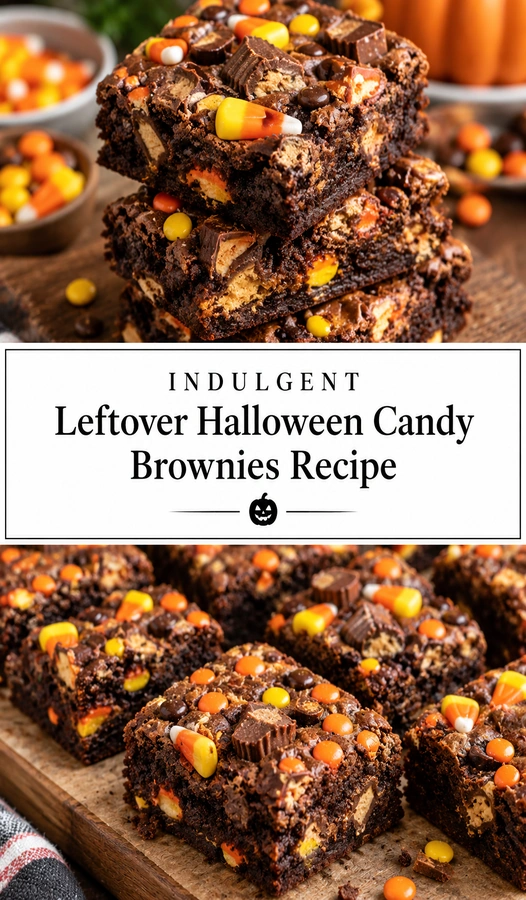
Expect a dense, fudgy texture with sudden bursts of chewiness and sweetness from various candies. The result is a heavy, decadent square that balances the deep bitterness of cocoa with the high sugar content of assorted treats.
A rich scent of toasted butter and melting chocolate fills the kitchen as these bake, often mingled with the sugary aroma of caramelizing marshmallows or fruit chews.
This recipe transforms a chaotic pile of assorted Halloween sweets into a cohesive dessert. It takes a standard brownie base and reinforces it with a variety of textures, from crunchy peanut butter cups to soft gummies.
Many home bakers love this approach because it clears out the candy bowl while creating a high-impact treat. It removes the need to buy separate mix-ins, relying instead on whatever the trick-or-treaters brought home.
Unlike store-bought brownies, which often have a uniform, cakey consistency, these are irregularly textured and intensely rich. Every single bite offers a different combination of candy flavors.
Families with kids enjoy the process of sorting through the candy to decide what makes the cut. It is an ideal activity for the day after October 31st.
Gather your favorite leftovers and follow these steps to create a sugary masterpiece.
- ●Why You’ll Love This Recipe
- ●A Brief Background on the Candy-Brownie Match
- ●Perfect For Post-Halloween Cleanup
- ●Chocolate Ingredient Spotlight
- ●Butter Ingredient Spotlight
- ●Key Ingredients
- ●How to Make It
- ●Pro Tips
- ●Delicious Variations
- ●Best Ways to Serve
- ●Storage and Leftovers
- ●Frequently Asked Questions
- ●Why This Recipe Belongs in Your Weekly Rotation
- ●Final Thoughts
These brownies provide a creative way to handle the inevitable sugar overload following the holiday season.
- ●Uses up a wide variety of leftover chocolate and chewy candies.
- ●Combines multiple textures, including gooey, crunchy, and fudgy.
- ●Requires minimal preparation time since the mix-ins are pre-made.
- ●Customizable based on the specific candies available in your house.
- ●Produces a visually impressive dessert with colorful candy peaks.
- ●Pairs perfectly with cold milk or a strong cup of coffee.
- ●Avoids the waste of throwing away unwanted candies.
- ●Satisfies intense chocolate cravings with a very rich profile.
- ●Can be easily sliced into small squares for large crowds.
These treats turn a pantry problem into a dessert solution that everyone in the household can enjoy.
A Brief Background on the Candy-Brownie Match |
Combining candy with brownies is a practical application of flavor layering. The bittersweet notes of high-quality cocoa powder cut through the overwhelming sweetness of milk chocolate and corn syrup found in most candies.
Adding solid pieces of candy creates pockets of different melting points. Some candies melt completely into the batter, creating swirls of flavor, while others maintain their shape, providing a structural contrast to the soft cake.
This method works effectively because brownies are naturally dense. They can support the weight of heavy candy chunks without collapsing or failing to bake through the center.
Perfect For Post-Halloween Cleanup |
This recipe is ideal for those busy days following a holiday when the kitchen is cluttered with candy wrappers. It allows parents to clear the counters while giving children a rewarding baking project.
It works well for casual get-togethers or school parties where a high-energy treat is welcomed. Because the candy mix varies, it is a great conversation starter regarding whose favorite candy made it into the batch.
For those who enjoy a variety of Tempting Spooky Monster Mash Brownies Recipe For Halloween Fun Easy Halloween Treats, this version offers a more streamlined way to use existing supplies without needing specific decorations.
Chocolate Ingredient Spotlight |
Unsweetened cocoa powder provides the essential structural bitterness that defines a brownie. Without a strong cocoa base, the added candy would make the dessert cloyingly sweet and one-dimensional. High-fat cocoa powder results in a fudgier center, whereas low-fat versions lean toward a cake-like crumb.
Butter Ingredient Spotlight |
Butter acts as the primary fat source, contributing a salty, creamy undertone that balances the sugar. When melted, it incorporates into the sugar and eggs to create an emulsion that keeps the brownies moist. For a deeper flavor, browning the butter beforehand adds a nutty aroma that complements the chocolate.
Key Ingredients |
These components form the base that supports the variety of candy additions.
- ●Unsweetened Cocoa Powder — provides the deep chocolate flavor and structure.
- ●Unsalted Butter — adds richness and a smooth mouthfeel.
- ●Granulated Sugar — creates the characteristic crackly top and sweetness.
- ●Eggs — binds the ingredients together and provides lift.
- ●All-Purpose Flour — gives the brownies their shape and stability.
- ●Vanilla Extract — enhances the chocolate and candy flavors.
- ●Assorted Halloween Candy — provides various textures and sweetness levels.
- ●Salt — balances the sugar and intensifies the cocoa.
How to Make It |
Follow these detailed steps to ensure the brownies bake evenly despite the heavy candy additions.
- Prep the oven and pan: Preheat your oven to 325°F (165°C). Grease an 8×8 inch baking pan and line it with parchment paper, leaving an overhang on the sides. This allows you to lift the brownies out easily without them breaking apart.
- Melt the butter and sugar: Combine the butter and sugar in a microwave-safe bowl, heating in 30-second intervals until the butter is melted. Stir the mixture until it is smooth and slightly glossy. Avoid overheating the butter to the point where it separates or burns.
- Incorporate cocoa and vanilla: Stir in the cocoa powder and vanilla extract while the butter mixture is still warm. The cocoa should be fully incorporated with no dry clumps remaining. A common mistake is adding cocoa to cold butter, which results in a grainy texture.
- Beat in the eggs: Add the eggs one at a time, whisking vigorously after each addition. Beat the batter until it looks shiny and smooth. Over-beating at this stage can introduce too much air, turning your fudgy brownies into a cake.
- Fold in dry ingredients: Gently stir in the flour and salt using a spatula. Stop mixing the moment no white streaks of flour are visible. Over-mixing the flour develops gluten, which makes the brownies tough rather than tender.
- Add the candy: Fold in the assorted candies, ensuring they are evenly distributed throughout the batter. If using very large pieces, chop them into 1/2-inch chunks. This ensures that every square contains a variety of treats and prevents large gaps in the batter.
- Bake and monitor: Pour the batter into the prepared pan and bake for 30 to 35 minutes. Check the center with a toothpick; it should come out with a few moist crumbs attached, but not wet batter. If the edges are pulling away from the sides but the center is still jiggly, bake for another 3-5 minutes.
- Cool completely: Let the brownies cool in the pan for at least one hour before lifting them out. Cutting into hot brownies often causes the melted candy to ooze out, ruining the clean edges of the squares.
1Use these techniques to refine the texture and appearance of your candy brownies.
- ●2Chop the candy: Cut larger bars or clusters into uniform pieces so the brownies bake evenly and every bite has a mix of flavors.
- ●3Use a water bath: If you prefer an extremely fudgy center, place the baking pan inside a larger pan filled with an inch of hot water.
- ●4Sift the cocoa: Pass the cocoa powder through a fine-mesh sieve to remove lumps before adding it to the butter.
- ●5Cool the pan: Chill the brownies in the refrigerator for 30 minutes before slicing for the cleanest cuts.
- ●6Balance the sugar: If your candy mix is predominantly milk chocolate, add a pinch more salt to the batter to cut the sweetness.
Delicious Variations |
Modify the base or the mix-ins to suit different taste preferences.
- ●Dark Chocolate Base: Use dark cocoa powder or add a handful of dark chocolate chips to reduce the overall sweetness.
- ●Nutty Twist: Add toasted walnuts or pecans along with the candy for an earthy contrast.
- ●Sea Salt Topping: Sprinkle flaky sea salt over the top immediately after removing the pan from the oven.
- ●Cheesecake Swirl: Dollop a mixture of cream cheese and sugar on top and swirl with a knife for a flavor similar to Indulge In Pioneer Woman Halloween Cheesecake Bars Recipe Spooky Dessert Ideas
- ●Espresso Boost: Stir one teaspoon of instant espresso powder into the melted butter to deepen the chocolate flavor.
These adjustments allow you to control the intensity of the sugar and the complexity of the flavor profile.
Best Ways to Serve |
Presentation enhances the indulgence of these candy-filled squares.
- ●Warm with Ice Cream: Serve a square slightly warmed in the microwave with a scoop of vanilla bean ice cream.
- ●Coffee Pairing: Pair with a black roast coffee or an espresso to balance the high sugar content.
- ●Platter Style: Arrange the squares on a platter with fresh raspberries or strawberries for a touch of acidity.
For a party setting, use a small sharp knife and wipe it clean between every cut to keep the colorful candy layers distinct.
If you are serving these alongside other treats, consider pairing them with Monster Halloween Popcorn Gf Easy Halloween Snack Mix Recipe to provide a salty contrast to the rich chocolate.
Storage and Leftovers |
Refrigerating
Store the brownies in an airtight container in the refrigerator for up to 7 days. This keeps the chocolate stable and the fudgy center firm.
Reheating
Warm individual squares in the microwave for 10 to 15 seconds. This softens the chocolate and candy without melting them completely into a liquid.
Freezing
Wrap individual squares in plastic wrap and place them in a freezer bag for up to 3 months. Thaw in the refrigerator overnight before serving.
Frequently Asked Questions |
- ●Q: Which candies work best in these brownies?A: Chocolate-based candies like miniatures, peanut butter cups, and caramels work best because they blend into the batter. Gummy candies or hard candies can be used, but they may not melt and will remain as chewy or crunchy pockets within the brownie.
- ●Q: Can I use a different type of flour?A: All-purpose flour is recommended for the best structural balance. You can use a 1:1 gluten-free flour blend, but the texture may be slightly more fragile, and you should allow the brownies to cool completely before attempting to slice them.
- ●Q: Why are my brownies cakey instead of fudgy?A: Cakey brownies usually result from over-beating the eggs or over-mixing the flour, which incorporates too much air and develops too much gluten. To keep them fudgy, stir the flour in gently and avoid over-whisking the batter.
- ●Q: How do I stop the candy from sinking to the bottom?A: Ensure the batter has reached a thick consistency before folding in the candies. If the batter is too thin, the heavy candy pieces will sink. Folding them in gently at the very end helps keep them suspended in the batter.
- ●Q: Can I make these without butter?A: You can substitute melted coconut oil for butter in a 1:1 ratio. This will result in a similar texture, though the flavor profile will shift slightly. Ensure the oil is melted and combined thoroughly with the sugar.
- ●Q: What is the best way to slice these for clean edges?A: The best method is to chill the brownies in the fridge for at least 30 minutes. Use a sharp chef’s knife and wipe the blade with a damp cloth after every single cut to remove melted chocolate residue.
Why This Recipe Belongs in Your Weekly Rotation |
While typically associated with the end of October, this recipe is a versatile solution for any time you have a surplus of sweets. It teaches the balance of flavors and the importance of texture in baking.
It reduces food waste that might otherwise be forgotten in the back of the pantry. The ability to customize the mix-ins means no two batches are ever exactly the same.
Whether you are hosting a casual movie night or simply looking for a weekend project with the kids, these brownies provide a high-reward result with minimal effort. They are a comforting, indulgent treat that brings a sense of playfulness to the kitchen.
Final Thoughts |
These brownies combine a classic chocolate base with the unpredictable variety of leftover treats, resulting in a dense and satisfying dessert. The process is straightforward, focusing on gentle mixing and patient cooling to achieve the perfect fudge consistency.
Turning a pile of candy into a gourmet-style treat is a rewarding way to extend the joy of the holiday season. It provides a unique flavor experience that traditional brownies simply cannot match.
Gather your candy bowl and start baking these decadent squares today.
Indulgent Leftover Halloween Candy Brownies Recipe
- Total Time: 55 minutes
- Yield: 16 squares 1x
Description
A rich, fudgy brownie base loaded with a variety of leftover Halloween candies for a multi-textured, decadent dessert.
Ingredients
- 1/2 cup unsalted butter, melted
- 1 cup granulated sugar
- 1/3 cup unsweetened cocoa powder
- 1 teaspoon vanilla extract
- 2 large eggs
- 1/2 cup all-purpose flour
- 1/4 teaspoon salt
- 2 cups assorted leftover Halloween candy, chopped
Instructions
- Preheat oven to 325°F (165°C). Grease an 8×8 inch baking pan and line with parchment paper.
- Stir together melted butter and sugar until smooth.
- Whisk in cocoa powder and vanilla extract until no lumps remain.
- Add eggs one at a time, beating well after each addition until the batter is shiny.
- Gently fold in the flour and salt using a spatula until just combined.
- Fold in the chopped Halloween candies until evenly distributed.
- Pour batter into the prepared pan and bake for 30-35 minutes, or until a toothpick comes out with moist crumbs.
- Cool in the pan for at least one hour before slicing into squares.
- Prep Time: 20 minutes
- Cook Time: 35 minutes
- Category: Dessert
- Method: Baking
- Cuisine: American